84, страница 9
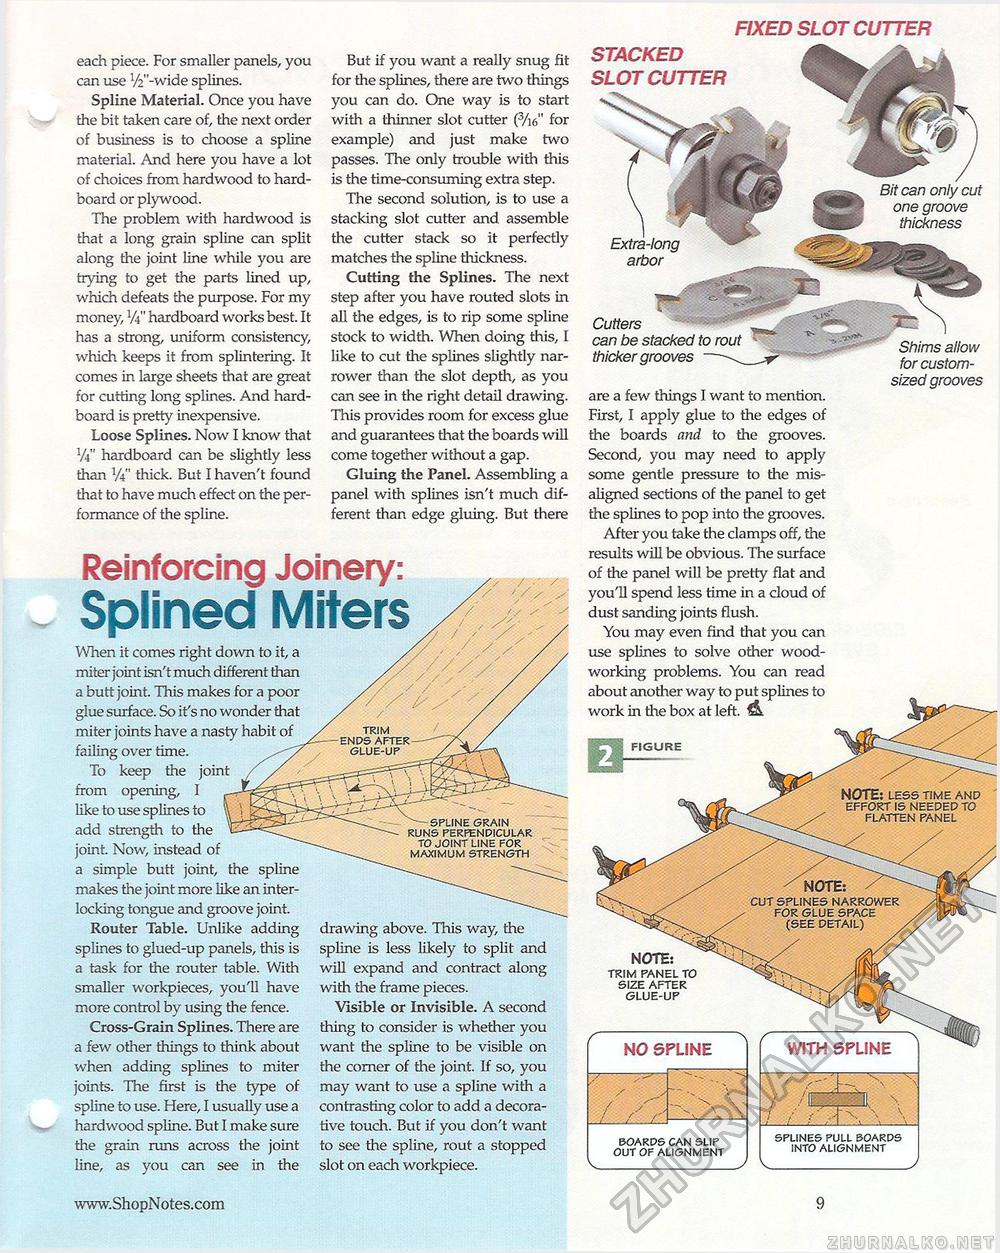
each piece. For smaller panels, you can use %"-wide splines. Spline Material. Once you have the bit taken care of, the next order of business is to choose a spline material. And here you have a lot of choices from hardwood to hard-board or plywood. The problem with hardwood is that a long grain spline can split along the joint line while you are trying to get the parts lined up, which defeats the purpose. For my money, Vi" hardboard works best. It has a strong, uniform consistency, which keeps it from splintering. It comes in large sheets that are great for cutting long splines. And hard-board is pretty inexpensive. Loose Splines. Now I know that y4" hardboard can be slightly less than V4" thick. But I haven't found that to have much effect on the performance of the spline. But if you want a really snug fit for the splines, there are two things you can do. One way is to start with a thinner slot cutter (Vie" for example) and just make two passes. The only trouble with this is the time-consuming extra step. The second solution, is to use a stacking slot cutter and assemble the cutter stack so it perfectly matches the spline thickness. Cutting the Splines. The next step after you have routed slots in all the edges, is to rip some spline stock to width. When doing this, I like to cut the splines slightly narrower than the slot depth, as you can see in the right detail drawing. This provides room for excess glue and guarantees that the boards will come together without a gap. Gluing the Panel. Assembling a panel with splines isn't much different than edge gluing. But there TRIM ENDS AFTER GLUE-UP -- SPLINE GRAIN RUNS PERPENDICULAR TO JOINT LINE FOR MAXIMUM STRENGTH Reinforcing Joinery: Splined Miters When it comes right down to it, a miter joint isn't much different than a butt joint. This makes for a poor glue surface. So it's no wonder that miter joints have a nasty habit of failing over time. To keep the joint from opening, 1 like to use splines to add strength to the joint. Now, instead of a simple butt joint, the spline makes the joint more like an interlocking tongue and groove joint. Router Table. Unlike adding splines to glued-up panels, this is a task for the router table. With smaller workpieces, you'll have more control by using the fence. Cross-Grain Splines. There are a few other things to think about when adding splines to miter joints. The first is the type of spline to use. Here, I usually use a hardwood spline. But I make sure the grain runs across the joint line, as you can see in the drawing above. This way, the spline is less likely to split and will expand and contract along with the frame pieces. Visible or Invisible. A second thing to consider is whether you want die spline to be visible on the corner of the joint. If so, you may want to use a spline with a contrasting color to add a decorative touch. But if you don't want to see the spline, rout a stopped slot on each workpiece.
I ! II ;• Ik / f \ \ SPLINES PULL BOARDS INTO ALIGNMENT FIXED SLOT CUTTER STACKED SLOT CUTTER NOTE: trim panel to size after glue-up WITH SPLINE I ! II ;• Ik / f \ \ SPLINES PULL BOARDS INTO ALIGNMENT FIGURE Bit can only cut one groove thickness NOTE: less time and effort is NEEDED to flatten panel arbor Cutters can be stacked to rout thicker grooves are a few things I want to mention. First, I apply glue to the edges of the boards and to the grooves. Second, you may need to apply some gentle pressure to the misaligned sections of the panel to get the splines to pop into the grooves. After you take the clamps off, the results will be obvious. The surface of die panel will be pretty flat and you'll spend less time in a cloud of dust sanding joints flush. You may even find that you can use splines to solve other woodworking problems. You can read about another way to put splines to work in die box at left. Shims allow for custom-sized grooves 9 |
||||||


