Woodworker's Journal 1983-7-3, страница 20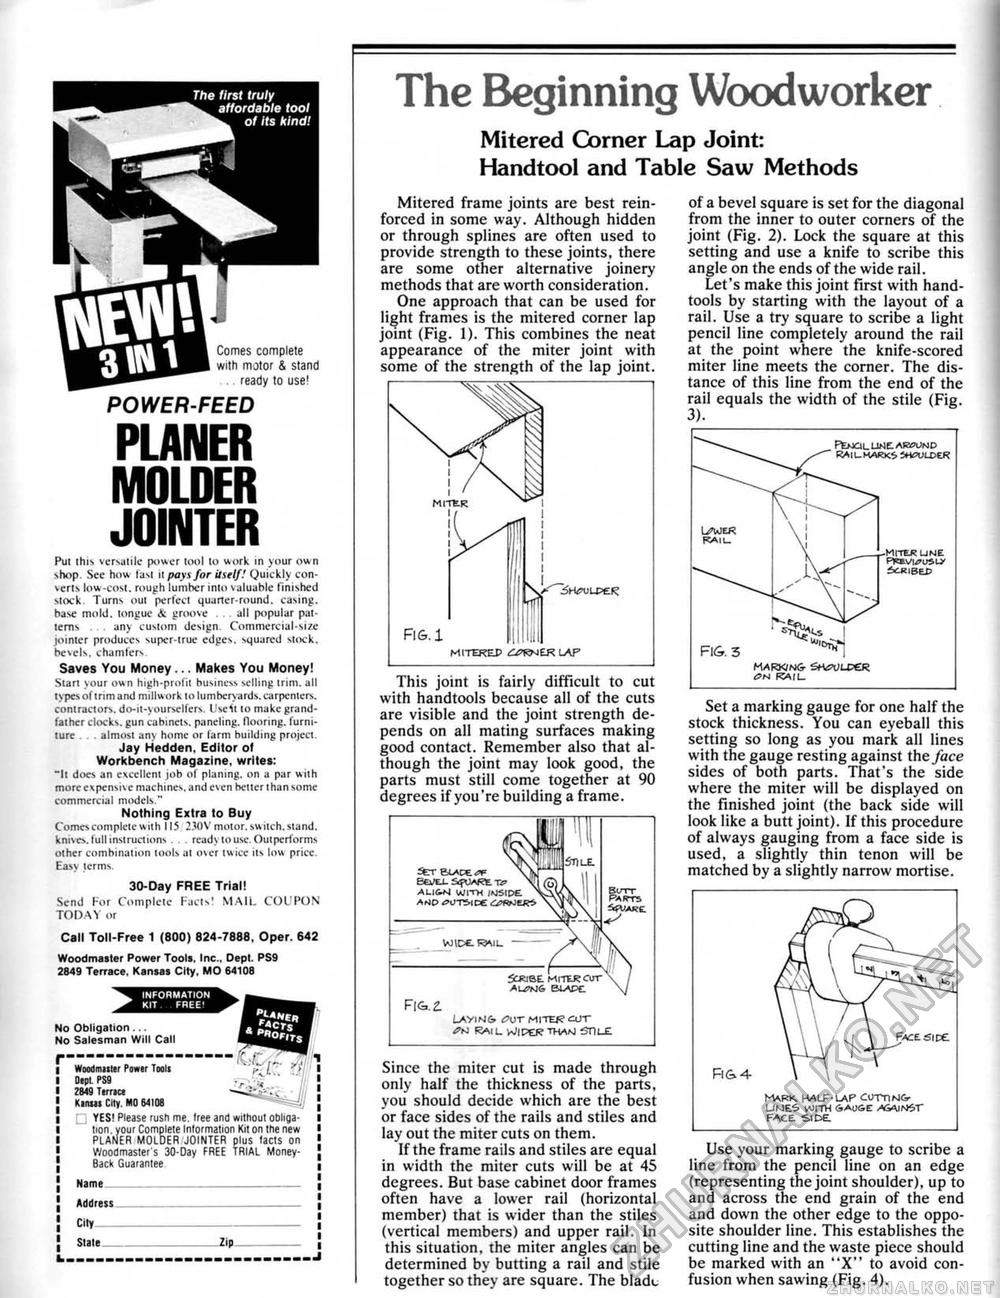
Comes complete with motor & stand ready to use! POWER-FEED PLANER MOLDER JOINTER Pui this versatile power tool 10 work in your own shop See how last tt pays for itself.' Quickly converts low-cost, rough lumber into \aluable finished slock Turns out perfect quarter-round, casing, hase mold, tongue Jt groove . all popular patterns any custom design. Commercial-size jointer produces super-true edges, squared stock. bcseU. chamfers Saves You Money ... Makes You Money! Start your ow n high-profit business selling trim, all types of trim and milluork to lumberyards, carpcmers, contractors, do-it-yourselfers Use it to make grandfather clocks, gun cabinets, paneling, flooring, furniture . almost any home or farm building project. Jay Hedden. Editor of Workbench Magazine, writes: "It docs an excellent job of planing, on a par with more expensive machines, and even better than some commercial models." Nothing Extra to Buy Comes complete with 115 230 V motor, switch, stand, kmses, full instructions . ready to use Outperforms other combination tools at oier twice its low price. Easy terms. 30-Day FREE Trial! Send For Complete Facts' MAIL COUPON TODAY or Call Toll-free 1 [800} 824-7888. Oper. 642 Woodmaster Power Tool*. Inc., Dept. PS9 2849 Terrace. Kansas City, MO 64108 No Obligation ... No Salesman Wiil Call Wwdtmitei Po*ir Iwti □epi PS9 Ttrnce Klitwi City. WO 64108 YES! Please rush me. tree and without obligation. your Complete Information Kit on Ihe new PLANER MOLDER JOINTER plus lacts on Wood master's 30-Day FREE TRIAL Money-Back Guarantee Name Address City_ Slate Zip The Beginning Woodworker Mitered Corner Lap Joint: Handtool and Table Saw Methods Mitered frame joints are best reinforced in some way. Although hidden or through splines are often used to provide strength to these joints, there are some other alternative joinery methods that are worth consideration. One approach that can be used for light frames is the mitered corner lap joint (Fig. 1). This combines the neat appearance of the miter joint with some of the strength of the lap joint. MITEKEP tiWER LAP This joint is fairly difficult to cut with handtools because all of the cuts are visible and the joint strength depends on all mating surfaces making good contact. Remember also that although the joint may look good, the parts must still come together at 90 degrees if you're building a frame. Ser BL^CEcT Eiei^j- s^rwJETc Al_itr4 WITH JMSIPE. ArJD <5ltT5tce tXXtnERS WtDC P5ML 5CRiSE MITfcROur BLAPt Fig t RAI [_ ^JtPEJ? THAM Sn t_E Since the miter cut is made through only half the thickness of the parts, you should decide which are the best or face sides of the rails and stiles and lay out the miter cuts on them. If the frame rails and stiles are equal in width the miter cuts will be at 45 degrees. But base cabinet door frames often have a lower rail (horizontal member) that is wider than the stiles (vertical members) and upper rail. In this situation, the miter angles can be determined by butting a rail and stiie together so they are square. The biadL. of a bevel square is set for the diagonal from the inner to outer corners of the joint (Fig. 2). Lock the square at this setting and use a knife to scribe this angle on the ends of the wide rail. Let's make this joint first with hand-tools by starting with the layout of a rail. Use a try square to scribe a light pencil line completely around the rail at the point where the knife-scored miter line meets the corner. The distance of this line from the end of the rail equals the width of the stile (Fig. 3). Set a marking gauge for one half the stock thickness. You can eyeball this setting so long as you mark all tines with the gauge resting against the face sides of both parts. That's the side where the miter will be displayed on the finished joint (the back side will look like a butt joint). If this procedure of always gauging from a face side is used, a slightly thin tenon will be matched by a slightly narrow mortise. HXRK. HALF - LAP CLFTT1N&- UME3 V0ITM 6AB6E ASAIN^T FACE SIDE Use your marking gauge to scribe a line from the pencil line on an edge (representing the joint shoulder), up to and across the end grain of the end and down the other edge to the opposite shoulder line. This establishes the cutting line and the waste piece should be marked with an "X" to avoid confusion when sawing (Fig. 4). |


