Woodworker's Journal 1983-7-5, страница 52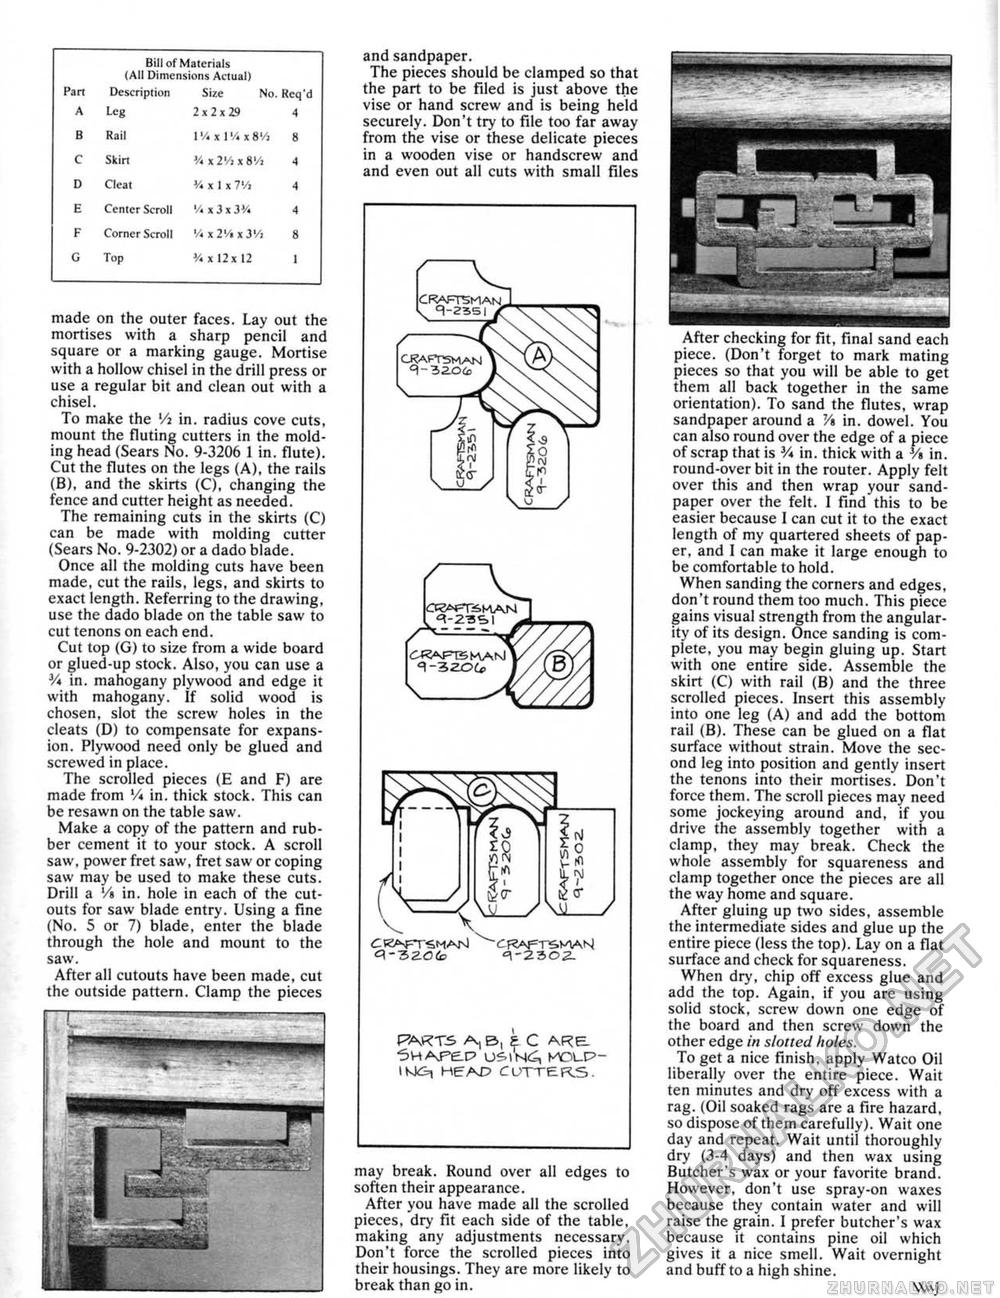
made on the outer faces. Lay out the mortises with a sharp pencil and square or a marking gauge. Mortise with a hollow chisel in the drill press or use a regular bit and clean out with a chisel. To make the '/i in. radius cove cuts, mount the fluting cutters in the molding head (Sears No. 9-3206 1 in. flute). Cut the flutes on the legs (A), the rails (B), and the skirts (C), changing the fence and cutter height as needed. The remaining cuts in the skirts (C) can be made with molding cutter (Sears No. 9-2302) or a dado blade. Once all the molding cuts have been made, cut the rails, legs, and skirts to exact length. Referring to the drawing, use the dado blade on the table saw to cut tenons on each end. Cut top (G) to size from a wide board or glued-up stock. Also, you can use a % in, mahogany plywood and edge it with mahogany. If solid wood is chosen, siot the screw holes in the cleats (D) to compensate for expansion. Plywood need only be glued and screwed in place. The scrolled pieces (E and F) are made from V* in. thick stock. This can be resawn on the table saw. Make a copy of the pattern and rubber cement it to your stock. A scroll saw, power fret saw, fret saw or coping saw may be used to make these cuts. Drill a */» in. hole in each of the cutouts for saw blade entry. Using a fine (No. 5 or 7) blade, enter the blade through the hole and mount to the saw. After all cutouts have been made, cut the outside pattern. Clamp the pieces and sandpaper. The pieces should be clamped so that the part to be Filed is just above the vise or hand screw and is being held securely. Don't try to File too far away from the vise or these delicate pieces in a wooden vise or handscrew and and even out all cuts with small Files CRAFTSMAN craftsman q-3 aoco C^PTSKAM <3-32.01fa q-2302. PARTS ^B, £ C ARE. ■SHAF^C? U^INCS, WLP-1WG, HE: AE> CDTTERS. may break. Round over all edges to soften their appearance. After you have made all the scrolled pieces, dry Fit each side of the table, making any adjustments necessary. Don't force the scrolled pieces into their housings. They are more likely to break than go in. After checking for Fit, Final sand each piece. (Don't forget to mark mating pieces so that you will be able to get them all back together in the same orientation). To sand the flutes, wrap sandpaper around a Vt in. dowel. You can also round over the edge of a piece of scrap that is V* in. thick with a V» in. round-over bit in the router. Apply felt over this and then wrap your sandpaper over the felt. 1 Find" this to be easier because 1 can cut it to the exact length of my quartered sheets of paper. and 1 can make it large enough to be comfortable to hold. When sanding the corners and edges, don't round them too much. This piece gains visual strength from the angularity of its design. Once sanding is complete, you may begin gluing up. Start with one entire side. Assemble the skirt (C) with rail (B) and the three scrolled pieces. Insert this assembly into one leg (A) and add the bottom rail (B). These can be glued on a flat surface without strain. Move the second leg into position and gently insert the tenons into their mortises. Don't force them. The scroll pieces may need some jockeying around and, if you drive the assembly together with a clamp, they may'break. Check the whole assembly for squareness and clamp together once the pieces are all the way home and square. After gluing up two sides, assemble the intermediate sides and glue up the entire piece (less the top). Lay on a flat surface and check for squareness. When dry, chip off excess glue and add the top. Again, if you are using solid stock, screw down one edge of the board and then screw down the other edge in slotted holes. To get a nice Finish, apply Watco Oil liberally over the entire piece. Wait ten minutes and dry off excess with a rag. (Oil soaked rags are a fire hazard, so dispose of them carefully). Wait one day and repeat. Wait until thoroughly dry (3-4 days) and then wax using Butcher's wax or your favorite brand. However, don't use spray-on waxes because they contain water and will raise the grain. I prefer butcher's wax because it contains pine oil which gives it a nice smell. Wait overnight and buff to a high shine. |
||||||||||||||||||||||||||||||||||||||||


