Woodworker's Journal 1984-8-4, страница 27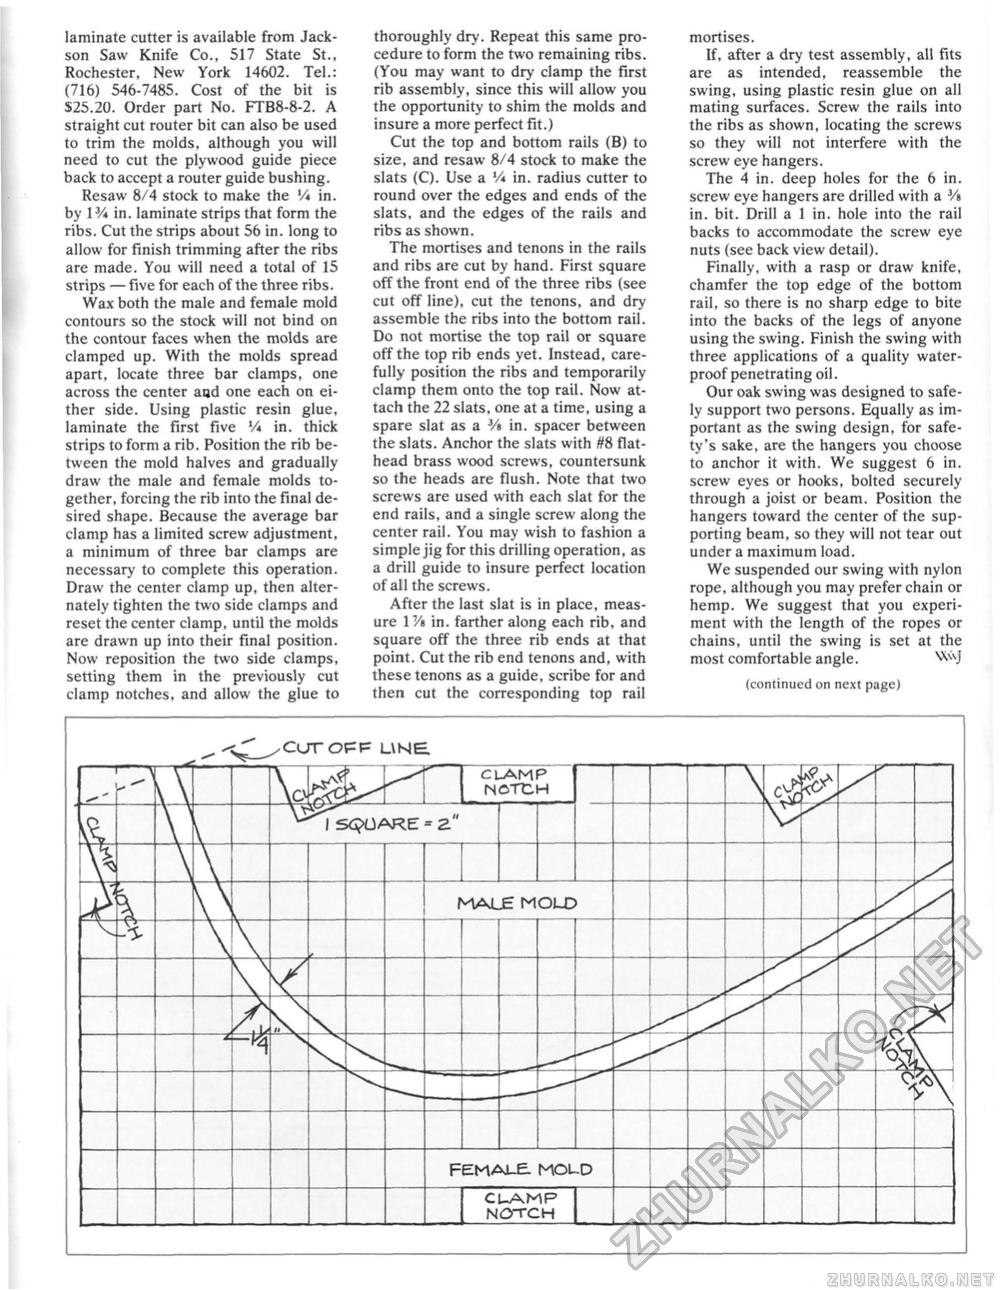
laminate cutter is available from Jackson Saw Knife Co., 517 State St., Rochester, New York 14602. Tel.: (716) 546-7485. Cost of the bit is $25.20. Order part No. FTB8-8-2. A straight cut router bit can also be used to trim the molds, although you will need to cut the plywood guide piece back to accept a router guide bushing. Resaw 8/4 stock to make the V* in. by IV* in. laminate strips that form the ribs. Cut the strips about 56 in. long to allow for finish trimming after the ribs are made. You will need a total of 15 strips — five for each of the three ribs. Wax both the male and female mold contours so the stock will not bind on the contour faces when the molds are clamped up. With the molds spread apart, locate three bar clamps, one across the center aad one each on either side. Using plastic resin glue, laminate the first five V* in. thick strips to form a rib. Position the rib between the mold halves and gradually draw the male and female molds together, forcing the rib into the final desired shape. Because the average bar clamp has a limited screw adjustment, a minimum of three bar clamps are necessary to complete this operation. Draw the center clamp up, then alternately tighten the two side clamps and reset the center clamp, until the molds are drawn up into their final position. Now reposition the two side clamps, setting them in the previously cut clamp notches, and allow the glue to thoroughly dry. Repeat this same procedure to form the two remaining ribs. (You may want to dry clamp the first rib assembly, since this will allow you the opportunity to shim the molds and insure a more perfect fit.) Cut the top and bottom rails (B) to size, and resaw 8/4 stock to make the slats (C). Use a V* in. radius cutter to round over the edges and ends of the slats, and the edges of the rails and ribs as shown. The mortises and tenons in the rails and ribs are cut by hand. First square off the front end of the three ribs (see cut off line), cut the tenons, and dry assemble the ribs into the bottom rail. Do not mortise the top rail or square off the top rib ends yet. Instead, carefully position the ribs and temporarily clamp them onto the top rail. Now attach the 22 slats, one at a time, using a spare slat as a V» in. spacer between the slats. Anchor the slats with #8 flat-head brass wood screws, countersunk so the heads are flush. Note that two screws are used with each slat for the end rails, and a single screw along the center rail. You may wish to fashion a simple jig for this drilling operation, as a drill guide to insure perfect location of all the screws. After the last slat is in place, measure 1 Vi in. farther along each rib, and square off the three rib ends at that point. Cut the rib end tenons and, with these tenons as a guide, scribe for and then cut the corresponding top rail mortises. If, after a dry test assembly, all fits are as intended, reassemble the swing, using plastic resin glue on all mating surfaces. Screw the rails into the ribs as shown, locating the screws so they will not interfere with the screw eye hangers. The 4 in. deep holes for the 6 in. screw eye hangers are drilled with a Vs in. bit. Drill a I in. hole into the rail backs to accommodate the screw eye nuts (see back view detail). Finally, with a rasp or draw knife, chamfer the top edge of the bottom rail, so there is no sharp edge to bite into the backs of the legs of anyone using the swing. Finish the swing with three applications of a quality waterproof penetrating oil. Our oak swing was designed to safely support two persons. Equally as important as the swing design, for safety's sake, are the hangers you choose to anchor it with. We suggest 6 in. screw eyes or hooks, bolted securely through a joist or beam. Position the hangers toward the center of the supporting beam, so they will not tear out under a maximum load. We suspended our swing with nylon rope, although you may prefer chain or hemp. We suggest that you experiment with the length of the ropes or chains, until the swing is set at the most comfortable angle. WVJ (continued on next page) |


