Woodworker's Journal 1993-17-5, страница 21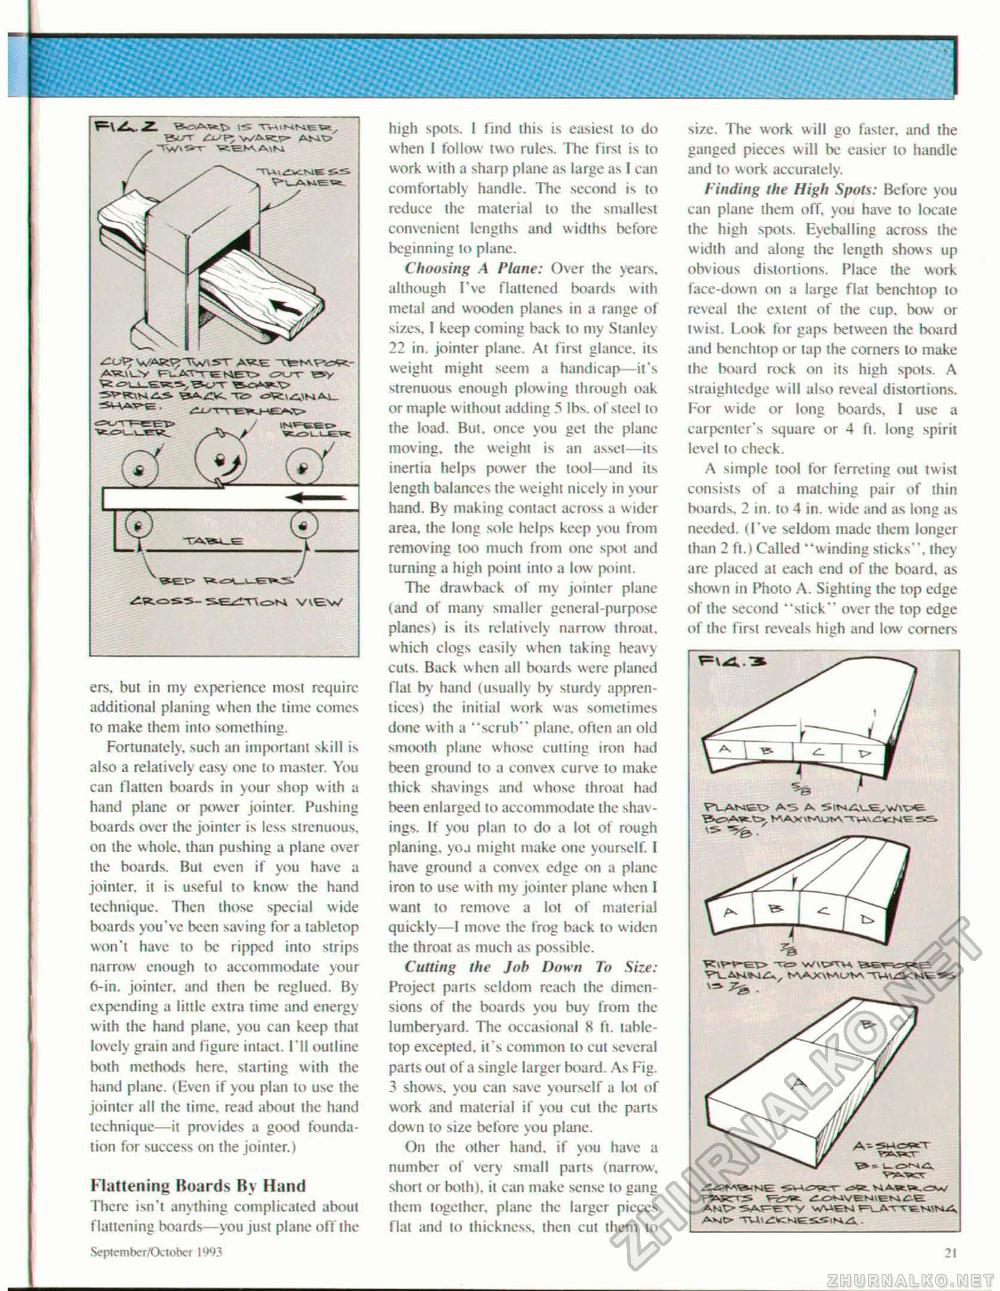
ers. but in my experience most require additional planing when the time comes to make them into something. Fortunately, such an important skill is also a relatively easy one to master, You can flatten boards in your shop w ith a hand plane or power jointer. Pushing boards over the jointer is less strenuous, on the whole, than pushing a plane over the boards. Bui even if you have a jointer, il is useful to know the hand technique. Then those special wide boards you've been saving for a tabletop won't have to be ripped into strips narrow enough to accommodate your 6-in. jointer, and ihen be reglued. By expending a little cxira lime and energy with the hand plane, you can keep that lovely grain and figure intact. I'll outline both methods here, starting with the hand plane. (Bven if you plan to use Ihe jointer alt the time, read aboul Ihe hand technique—it provides a good foundation for success on the jointer.) Flattening Boards By Hand There isn't anything complicated about flattening boards—you jusl plane off the Scptembcr/Otlobcr 1W3 high spots. I find this is easiest to do when I follow two rules. The first is to work with a sharp plane as large as I can comfortably handle. The second is to reduce the material to the smallest convenient lengths and widihs before beginning to plane. Choosing .4 Plane: Over the years, although I've flattened boards with metal and wooden planes in a range of sizes, I keep coming back lo my Stanley 22 in. jointer plane. At first glance, its weight mighi seem a handicap—it's strenuous enough plowing through oak or maple without adding 5 lbs. of steel to the load. Bui. once you get the plane moving, the weight is an asset—its inertia helps power ihe tool—and iis length balances the weight nicely in your hand. By making contact across a wider area, the long sole helps keep you from removing loo much from one spot and turning a high point into a low point. The drawback of my jointer plane (and of many smaller general-purpose planes) is its relatively narrow ihroat, which clogs easily when taking heavy culs. Back w hen all boards were planed flal by hand (usually by sturdy apprentices) the initial work was sometimes done with a "scrub" plane, oflen an old smooth plane whose culling iron had been ground lo a convex curve to make thick shavings and whose ihroat had been enlarged to accommodate the shavings. If you plan to do a lot of rough planing, yoj might make one yourself. I have ground a convex edge on a plane iron to use with my jointer plane when I want to remove a lot of material quickly—I move the frog back to widen the throat as much as possible. Cutting the Job Down To Size: Project parts seldom reach the dimensions of the boards you buy from the lumberyard. The occasional 8 fi. table-top excepted, it's common to cut several parts out of" a single larger board. As Fig. 3 shows, you can save yourself a lot of work and material if you cut the pans down to size before you plane. On ihe other hand, if you have a number of very small parts (narrow, short or both), il can make sense to gang them together, plane the larger pieces flat and to thickness, then cut them to size. The work will go faster, and the ganged pieces w ill be easier to handle and to work accurately. Finding the High Spots: Before you can plane them off. you have to locate Ihe high spots. Evcballing across the width and along the length shows up obvious distortions. Place the work face-down on a large flat benchtop lo reveal ihe extent of ihe cup. bow or iw ist. Look for gaps between the board and benchtop or lap the corners lo make the board rock on its high spots. A straightedge w ill also reveal distortions. For wide or long boards. 1 use a carpenter's square or 4 fl. long spirit level to check. A simple tool for ferreling oul twist consists of a matching pair of thin boards, 2 in. to 4 in. w ide and as long as needed. (I've seldom made them longer than 2 fl.) Called "winding slicks", they are placed at each end of ihe board, as shown in Pholo A. Sighting the top edge of the second "Mick" over the top edge of the first reveals high and low corners TUua^MCW A ANt> 5AFEW WViEN F\>TT£H\HA A-vgO TVll^te.Me^SiUjS.. 21 |


