Woodworker's Journal 1993-17-5, страница 23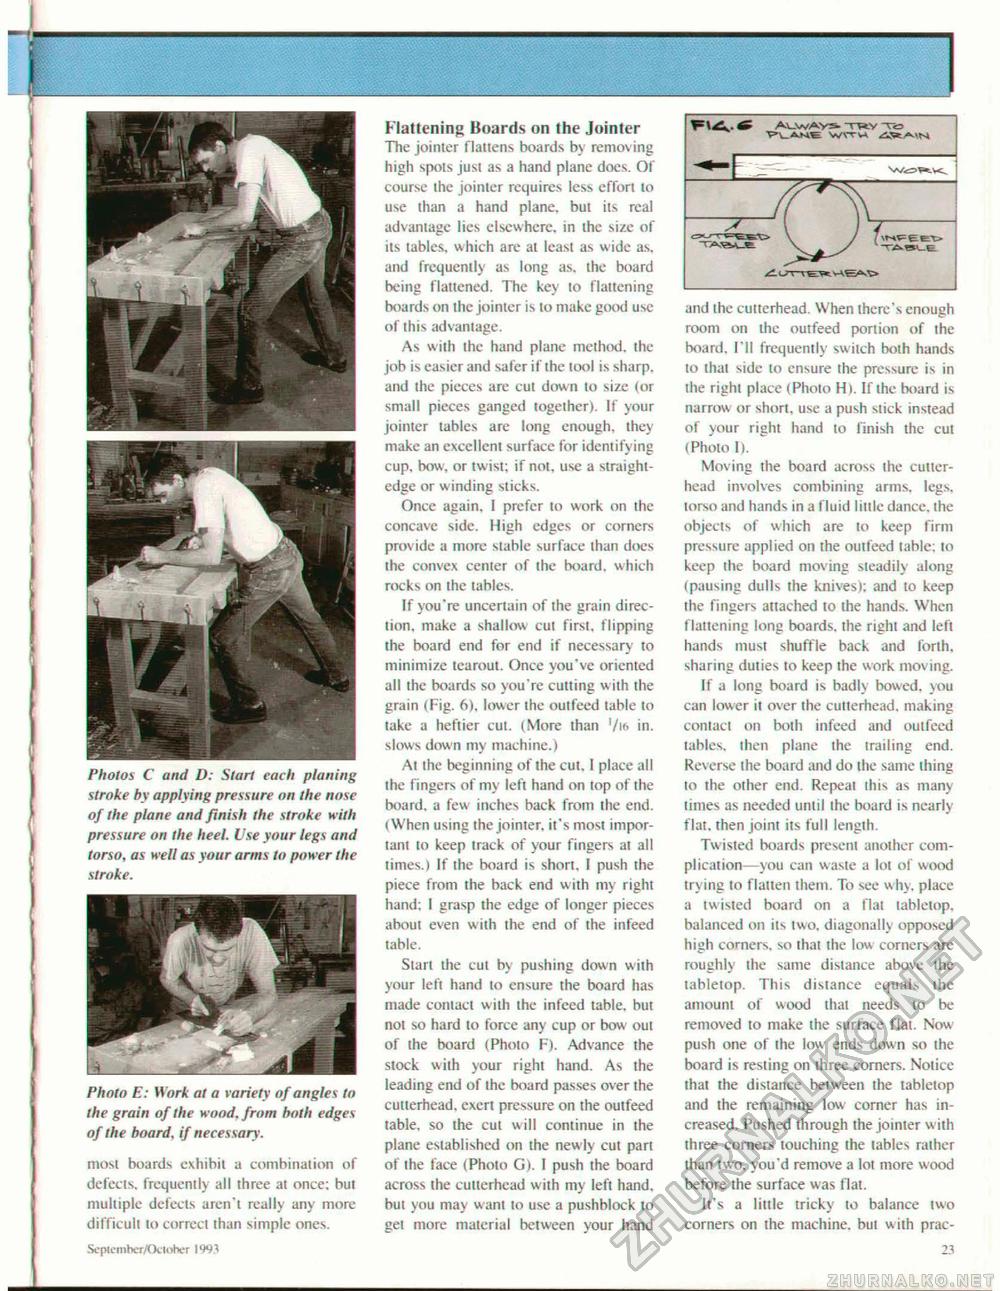
MM Photos C and D: Start each planing stroke by applying pressure on the nose of the plane and finish the stroke with pressure on the heel. Use your legs and torso, as well as your arms to power the stroke. Photo E: H orA at a variety of angles to the grain of the wood, from both edges of the board, if necessary. most boards exhibit a combination of defects, frequently all three at once: but multiple defects aren't really any more difficult to correct than simple ones. Septrmher/Oi. luher 1991 Flattening Boards on the Jointer The jointer flattens boards by removing high spots just as a hand plane does. Of course the jointer requires less effort to use than a hand plane, but its real advantage lies elsewhere, in the size of its tables, which are at least as wide as. and frequently as long as. the board being flattened. The key to flattening boards on the jointer is to make good use of this advantage. As with the hand plane method, the job is easier and safer if the tool is sharp, and the pieces are cut down to size (or small pieces ganged together). If your jointer tables arc long enough, they make an excellent surface for identifying cup, bow, or twist; if not, use a straightedge or winding sticks. Once again. I prefer to work on the concave side. High edges or comers provide a more stable surface than docs the convex center of the board, which rocks on ihe tables. If you're uncertain of the grain direction, make a shallow cut first, flipping the board end for end if necessary to minimize tcarout. Once you've oriented all the boards so you're cutting with the grain (Fig. 6), lower the outfeed table to take a heftier cut. (More than '/i<> in. slows down my machine.) At ihe beginning of the cut. I place all Ihe fingers of my left hand on top of the board, a few inches back from the end. (When using the jointer, it's most important to keep track of your fingers ai all times.) If the board is short. I push the piece from the back end with my right hand; I grasp the edge of longer pieces about even with the end of the infeed table. Start the cut by pushing down with your left hand to ensure the board has made contact with the infeed table, bui not so hard to force any cup or bow out of the board (Photo F). Advance the stock with your right hand. As the leading end of Ihe board passes over the cutterhead. exert pressure on the outfeed table, so ihe cut will continue in the plane established on the newly cut part of the face (Photo G). I push the board across the cuttcrhead with my left hand, bul you may want to use a pushblock to get more malerial between your hand and the cutterhead. When there's enough room on the outfeed portion of the hoard. I'll frequently switch both hands to that side lo ensure the pressure is in ihe right place (Photo Hi. If the board is narrow or short, use a push stick instead of your right hand lo finish the cut (Photo I). Moving the board across the culler-head involves combining arms, legs, torso and hands in a fluid little dance, the objects of which are to keep firm pressure applied on the outfeed table; to keep the board mov ing steadily along {pausing dulls the knives): and to keep the fingers attached to ihe hands. When flatlening long boards, the right and left hands must shuffle back and forth, sharing duiies lo keep the work moving. If a long board is badly bowed, you can lower it over ihe cutterhead, making contact oil both infeed and outfeed tables, (hen plane the trailing end. Rev erse (he board and do the same thing to the other end. Repeat this as many times as needed until the board is nearly flat, then joint its full length. Twisted boards present another complication—you can waste a lot of wood trying lo flatten them. To see why. place a twisied board on a Hat lablelop. balanced on its two. diagonally opposed high corners, so that the low corners are roughly ihe same distance above the labletop. This distance equals the amount of wood thai needs lo be removed to make ihe surface flat. Now push one of the low ends down so ihe board is resting on ihree corners. Notice that the distance between the labletop and the remaining low comer has increased. Pushed through the jointer wilh three corners touching the tables rather than two. you'd remove a lot more wood before the surface was flat. It's a little tricky to balance (wo corners on the machine, but with prac- 23 |


