Woodworker's Journal 2006-30-5, страница 35
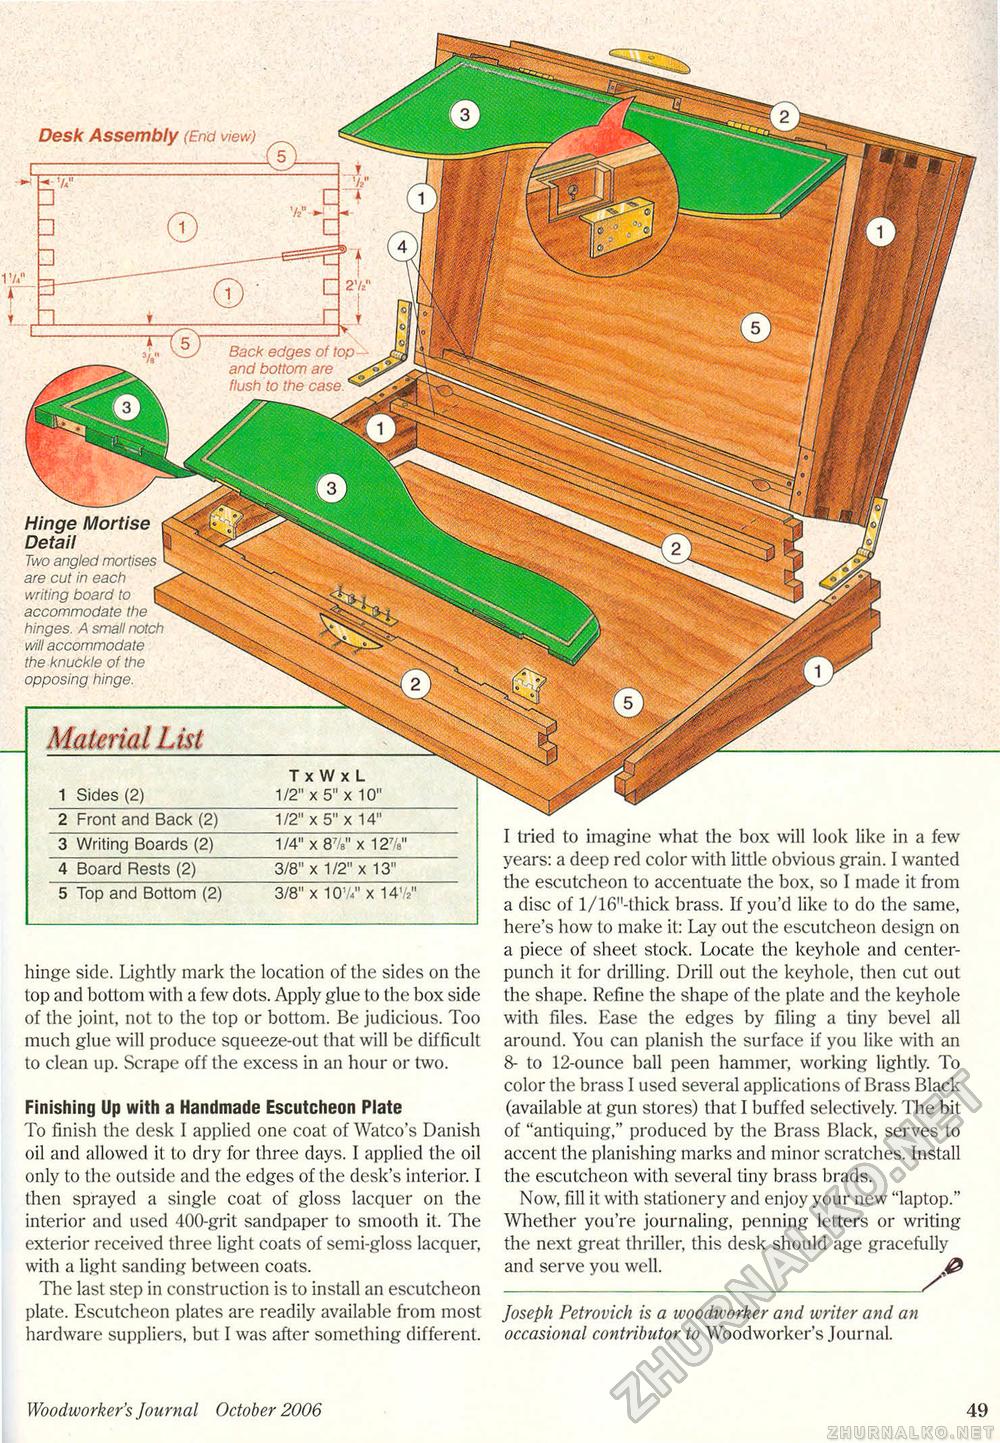
Hinge Mortise Detail Two angled mortises are cut in each writing board to accommodate the hinges. A small notch will accommodate the knuckle of the opposing hinge. Desk Assembly (End view) Material List T x W x L 1 Sides (2) 1/2" x 5" x 10" 2 Front and Back (2) 1/2" x 5" x 14" 3 Writing Boards (2) 1/4" x 87/8" x 127a" 4 Board Rests (2) 3/8" x 1/2" x 13" 5 Top and Bottom (2) 3/8" x 101A" x 141/2" hinge side. Lightly mark the location of the sides on the top and bottom with a few clots. Apply glue to the box side of the joint, not to the top or bottom. Be judicious. Too much glue will produce squeeze-out that will be difficult to clean up. Scrape off the excess in an hour or two. Finishing Up with a Handmade Escutcheon Plate To finish the desk I applied one coat of Watco's Danish oil and allowed it to dry for three clays. I applied the oil only to the outside and the edges of the desk's interior. I then sprayed a single coat of gloss lacquer on the interior and used 400-grit sandpaper to smooth it. The exterior received three light coats of semi-gloss lacquer, with a light sanding between coats. The last step in construction is to install an escutcheon plate. Escutcheon plates are readily available from most hardware suppliers, but I was after something different. Joseph Petrovich is a woodworker and writer and an occasional contributor to Woodworker's Journal. I tried to imagine what the box will look like in a few years: a deep red color with little obvious grain. I wanted the escutcheon to accentuate the box, so I made it from a disc of l/16"-thick brass. If you'd like to do the same, here's how to make it: Lay out the escutcheon design on a piece of sheet stock. Locate the keyhole and center-punch it for drilling. Drill out the keyhole, then cut out the shape. Refine the shape of the plate and the keyhole with files. Ease the edges by filing a tiny bevel all around. You can planish the surface if you like with an 8- to 12-ounce ball peen hammer, working lightly. To color the brass I used several applications of Brass Black (available at gun stores) that I buffed selectively. The bit of "antiquing," produced by the Brass Black, serves to accent the planishing marks and minor scratches. Install the escutcheon with several tiny brass brads. Now, fill it with stationery and enjoy your new "laptop." Whether you're journaling, penning letters or writing the next great thriller, this desk should age gracefully and serve you well. Woodworker's Journal October 2006 49 |


