Woodworker's Journal 2008-32-3, страница 38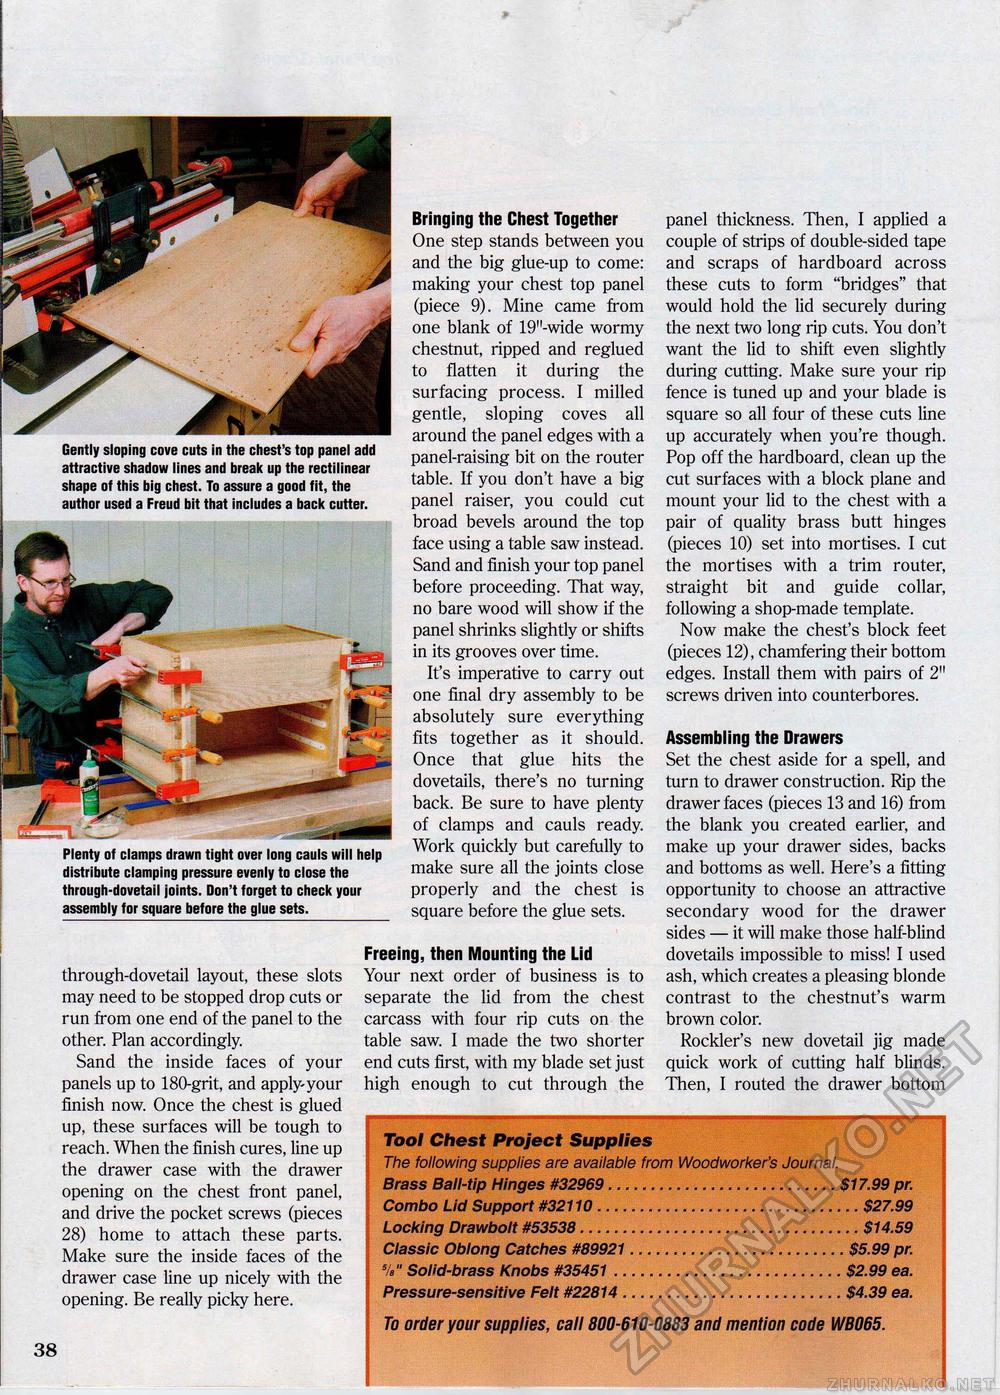
Gently sloping cove cuts in the chest's top panel add attractive shadow lines and break up the rectilinear shape of this big chest. To assure a good fit, the author used a Freud bit that includes a back cutter. Plenty of clamps drawn tight over long cauls will help distribute clamping pressure evenly to close the through-dovetail joints. Don't forget to check your assembly for square before the glue sets. Bringing the Chest Together One step stands between you and the big glue-up to come: making your chest top panel (piece 9). Mine came from one blank of 19"-wide wormy chestnut, ripped and reglued to flatten it during the surfacing process. I milled gentle, sloping coves all around the panel edges with a panel-raising bit on the router table. If you don't have a big panel raiser, you could cut broad bevels around the top face using a table saw instead. Sand and finish your top panel before proceeding. That way, no bare wood will show if the panel shrinks slightly or shifts in its grooves over time. It's imperative to carry out one final dry assembly to be absolutely sure everything fits together as it should. Once that glue hits the dovetails, there's no turning back. Be sure to have plenty of clamps and cauls ready. Work quickly but carefully to make sure all the joints close properly and the chest is square before the glue sets. through-dovetail layout, these slots may need to be stopped drop cuts or run from one end of the panel to the other. Plan accordingly. Sand the inside faces of your panels up to 180-grit, and apply-your finish now. Once the chest is glued up, these surfaces will be tough to reach. When the finish cures, line up the drawer case with the drawer opening on the chest front panel, and drive the pocket screws (pieces 28) home to attach these parts. Make sure the inside faces of the drawer case line up nicely with the opening. Be really picky here. Freeing, then Mounting the Lid Your next order of business is to separate the lid from the chest carcass with four rip cuts on the table saw. I made the two shorter end cuts first, with my blade set just high enough to cut through the panel thickness. Then, I applied a couple of strips of double-sided tape and scraps of hardboard across these cuts to form "bridges" that would hold the lid securely during the next two long rip cuts. You don't want the lid to shift even slightly during cutting. Make sure your rip fence is tuned up and your blade is square so all four of these cuts line up accurately when you're though. Pop off the hardboard, clean up the cut surfaces with a block plane and mount your lid to the chest with a pair of quality brass butt hinges (pieces 10) set into mortises. I cut the mortises with a trim router, straight bit and guide collar, following a shop-made template. Now make the chest's block feet (pieces 12), chamfering their bottom edges. Install them with pairs of 2" screws driven into counterbores. Assembling the Drawers Set the chest aside for a spell, and turn to drawer construction. Rip the drawer faces (pieces 13 and 16) from the blank you created earlier, and make up your drawer sides, backs and bottoms as well. Here's a fitting opportunity to choose an attractive secondary wood for the drawer sides — it will make those half-blind dovetails impossible to miss! I used ash, which creates a pleasing blonde contrast to the chestnut's warm brown color. Rockler's new dovetail jig made quick work of cutting half blinds. Then, I routed the drawer bottom 38 Tool Chest Project Supplies The following supplies are available from Woodworker's Journal. Brass Ball-tip Hinges #32969...........................$17.99 pr. Combo Lid Support #32110..............................$27.99 Locking Drawbolt #53538.................................$14.59 Classic Oblong Catches #89921.........................$5.99 pr. %" Solid-brass Knobs #35451 ..........................$2.99 ea. Pressure-sensitive Felt #22814.........................$4.39 ea. To order your supplies, call 800-610-0883 and mention code WB065. |


