Popular Woodworking 2009-10 № 178, страница 45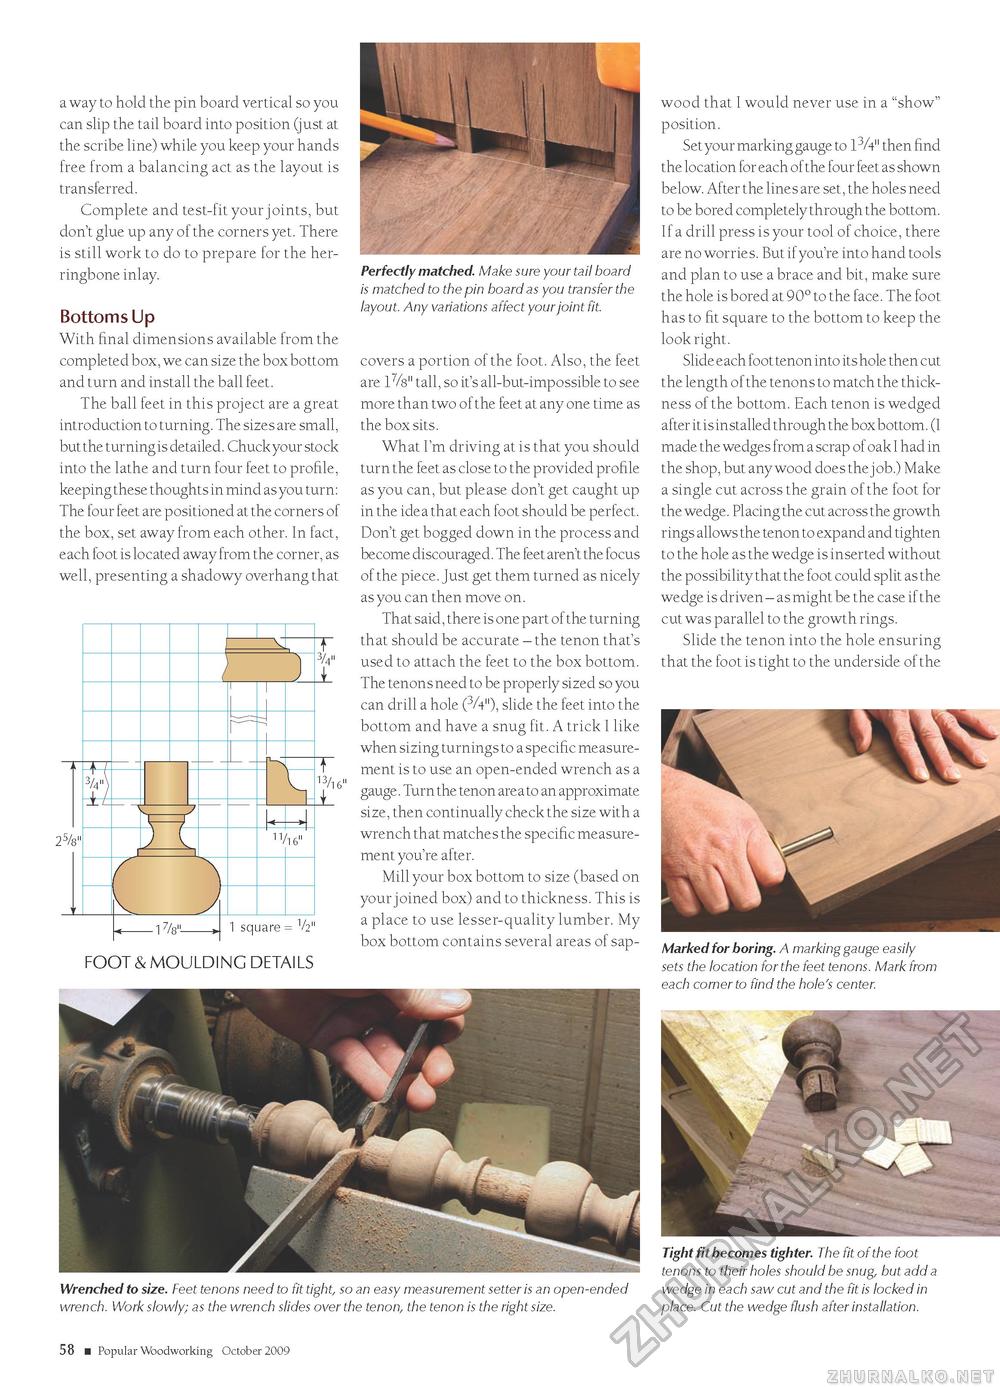
a way to hold the pin board vertical so you can slip the tail board into position (just at the scribe line) while you keep your hands free from a balancing act as the layout is transferred. Complete and test-fit your joints, but don't glue up any of the corners yet. There is still work to do to prepare for the herringbone inlay. Bottoms Up With final dimensions available from the completed box, we can size the box bottom and turn and install the ball feet. The ball feet in this project are a great introduction to turning. The sizes are small, but the turning is detailed. Chuck your stock into the lathe and turn four feet to profile, keeping these thoughts in mind as you turn: The four feet are positioned at the corners of the box, set away from each other. In fact, each foot is located away from the corner, as well, presenting a shadowy overhang that 1 square = V2" FOOT & MOULDiNG DETAiLS Perfectly matched. Make sure your tail board is matched to the pin board as you transfer the layout. Any variations affect your joint fit. covers a portion of the foot. Also, the feet are 1%" tall, so it's all-but-impossible to see more than two of the feet at any one time as the box sits. What I'm driving at is that you should turn the feet as close to the provided profile as you can, but please don't get caught up in the idea that each foot should be perfect. Don't get bogged down in the process and become discouraged. The feet aren't the focus of the piece. Just get them turned as nicely as you can then move on. That said, there is one part of the turning that should be accurate - the tenon that's used to attach the feet to the box bottom. The tenons need to be properly sized so you can drill a hole (3A"), slide the feet into the bottom and have a snug fit. A trick I like when sizing turnings to a specific measurement is to use an open-ended wrench as a gauge. Turn the tenon are a to an approximate size, then continually check the size with a wrench that matches the specific measurement you're after. Mill your box bottom to size (based on your joined box) and to thickness. This is a place to use lesser-quality lumber. My box bottom contains several areas of sap- wood that I would never use in a "show" position. Set your marking gauge to 13A" then find the location for each of the four feet as shown below. After the lines are set, the holes need to be bored completely through the bottom. I f a drill press is your tool of choice, there are no worries. But if you're into hand tools and plan to use a brace and bit, make sure the hole is bored at 90° to the face. The foot has to fit square to the bottom to keep the look right. Slide each foot tenon into its hole then cut the length of the tenons to match the thickness of the bottom. Each tenon is wedged after it is installed through the box bottom. (I made the wedges from a scrap of oak I had in the shop, but any wood does the job.) Make a single cut across the grain of the foot for the wedge. Placing the cut across the growth rings allows the tenon to expand and tighten to the hole as the wedge is inserted without the possibility that the foot could split as the wedge is driven - as might be the case if the cut was parallel to the growth rings. Slide the tenon into the hole ensuring that the foot is tight to the underside of the Marked for boring. A marking gauge easily sets the location for the feet tenons. Mark from each corner to find the hole's center. Wrenched to size. Feet tenons need to fit tight, so an easy measurement setter is an open-ended wrench. Work slowly; as the wrench slides over the tenon, the tenon is the right size. Tight fit becomes tighter. The fit of the foot tenons to their holes should be snug, but add a wedge in each saw cut and the fit is locked in place. Cut the wedge flush after installation. 58 ■ Popular Woodworking October 2009 |


