65 - Our Best Bench Yet, страница 21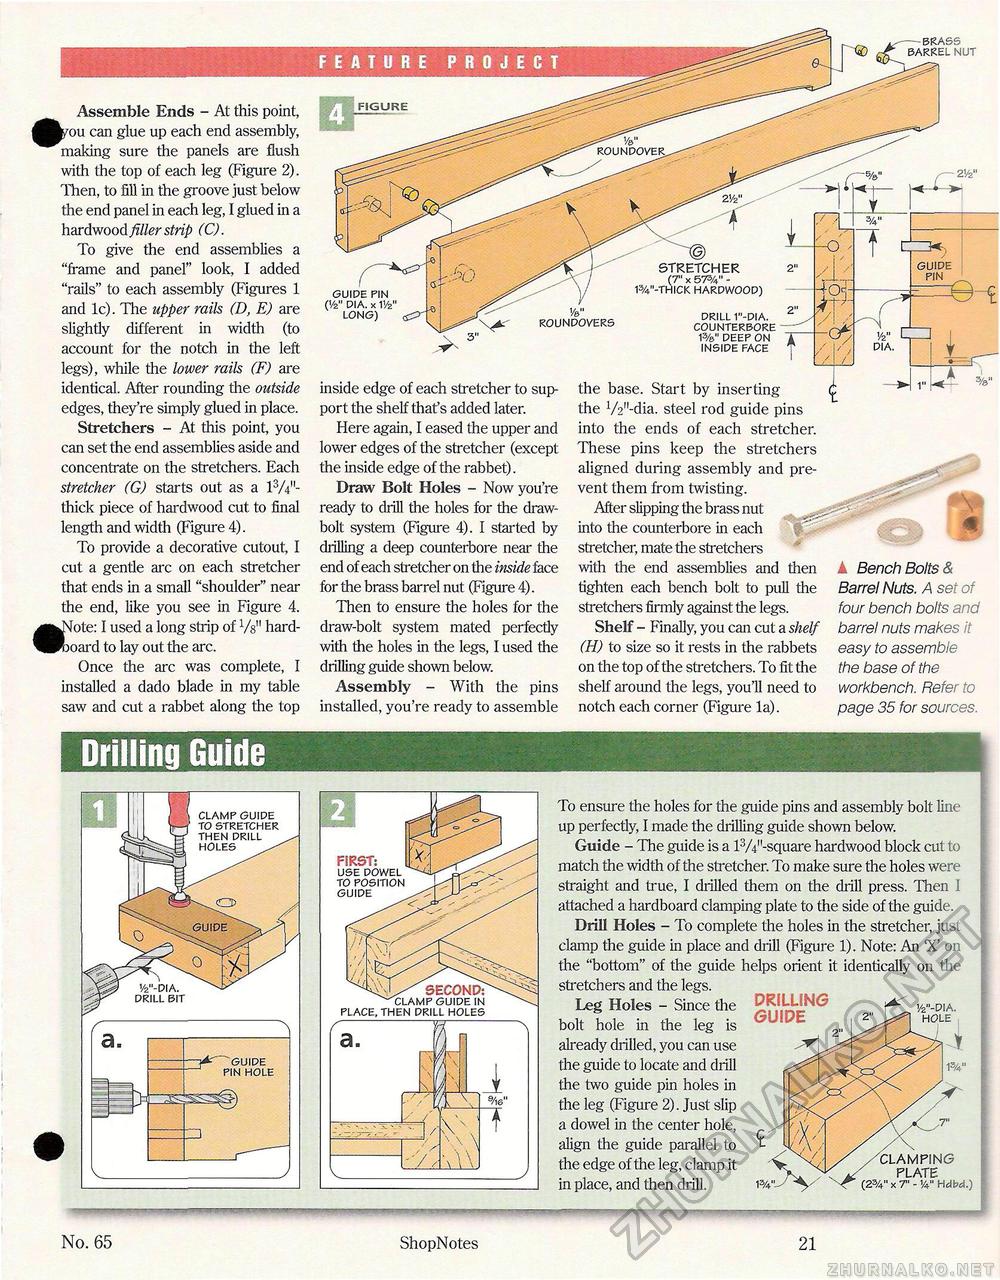
FEATURE PROJECT — brass barrel nut Assemble Ends - At this point, ou can glue up each end assembly, making sure the panels are flush with the top of each leg (Figure 2). Then, to fill in the groove just below the end panel in each leg, I glued in a hardwood filler strip (C). To give the end assemblies a "frame and panel" look, I added "rails" to each assembly (Figures 1 and lc). The upper rails (D, E) are slightly different in width (to account for the notch in the left legs), while the lower rails (F) are identical. After rounding the outside edges, they're simply glued in place. Stretchers - At this point, you can set the end assemblies aside and concentrate on the stretchers. Each stretcher (G) starts out as a l3/*"-thick piece of hardwood cut to final length and width (Figure 4). To provide a decorative cutout, I cut a gentle arc on each stretcher that ends in a small "shoulder" near the end, like you see in Figure 4. ote: I used a long strip of Vs" hard-oard to lay out the arc. Once the arc was complete, I installed a dado blade in my table saw and cut a rabbet along the top Drilling GuideGUIDE PIN (Vz" DIA. x V/z" LONG) inside edge of each stretcher to support the shelf that's added later. Here again, I eased the upper and lower edges of the stretcher (except the inside edge of the rabbet). Draw Bolt Holes - Now you're ready to drill the holes for the draw-bolt system (Figure 4). I started by drilling a deep counterbore near the end of each stretcher on the inside face for the brass barrel nut (Figure 4). Then to ensure the holes for the draw-bolt system mated perfectly with the holes in the legs, I used the drilling guide shown below. Assembly - With the pins installed, you're ready to assemble the base. Start by inserting the W'-dia. steel rod guide pins into the ends of each stretcher. These pins keep the stretchers aligned during assembly and prevent them from twisting. After slipping the brass nut into the counterbore in each stretcher, mate the stretchers with the end assemblies and then tighten each bench bolt to pull the stretchers firmly against the legs. Shelf - Finally, you can cut a shelf (H) to size so it rests in the rabbets on the top of the stretchers. To fit the shelf around the legs, you'll need to notch each corner (Figure la). A Bench Bolts & Barrel Nuts. A set of four bench bolts and barrel nuts makes it easy to assemble the base of the workbench. Refer to page 35 for sources. CLAMP GUIDE IN PLACE, THEN DRILL HOLES
To ensure the holes for the guide pins and assembly bolt line up perfectly, I made the drilling guide shown below. Guide - The guide is a l-W'-square hardwood block cut to match the width of the stretcher. To make sure the holes were straight and true, I drilled them on the drill press. Then I attached a hardboard clamping plate to the side of the guide. Drill Holes - To complete the holes in the stretcher, just clamp the guide in place and drill (Figure 1). Note: An 'X' on the "bottom" of the guide helps orient it identically on the stretchers and the legs. PRILLING GUIDE 2" Leg Holes - Since the bolt hole in the leg is already drilled, you can use the guide to locate and drill the two guide pin holes in the leg (Figure 2). Just slip a dowel in the center hole, align the guide parallel to the edge of the leg, clamp it in place, and then drill. w CLAMPING PLATE (2%" x T - 1/4" Hdk>d.) No. 65 ShopNotes 21 |
||||||||||||||||||


