65 - Our Best Bench Yet, страница 23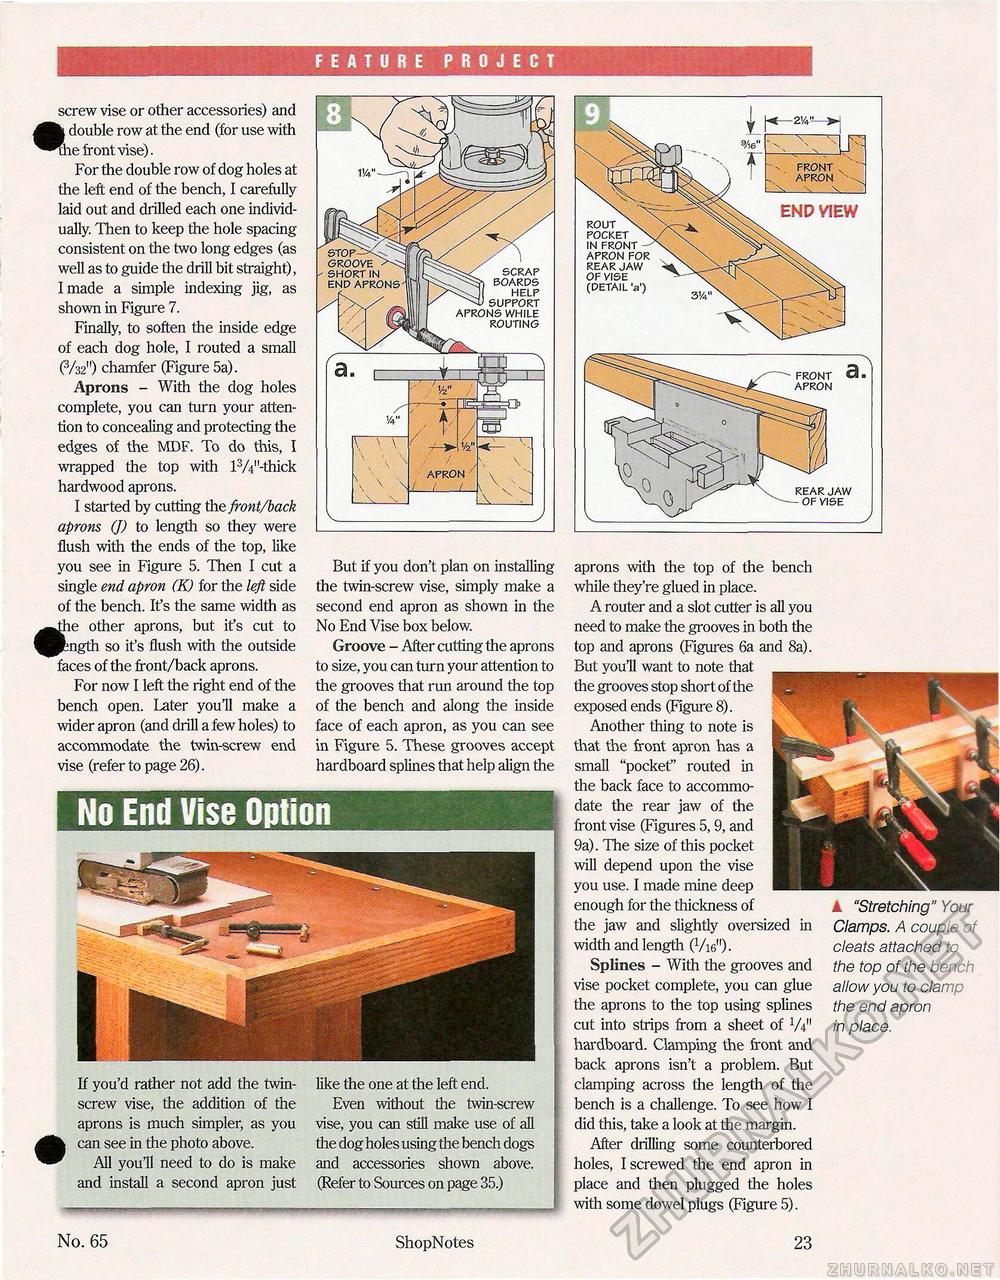
FEATURE PROJECT screw vise or other accessories) and double row at the end (for use with the front vise). For the double row of dog holes at the left end of the bench, I carefully-laid out and drilled each one individually. Then to keep the hole spacing consistent on the two long edges (as well as to guide the drill bit straight), I made a simple indexing jig, as shown in Figure 7. Finally, to soften the inside edge of each dog hole, I routed a small (V32") chamfer (Figure 5a). Aprons - With the dog holes complete, you can turn your attention to concealing and protecting the edges of the MDF. To do this, I wrapped the top with lVV'-thick hardwood aprons. I started by cutting the front/back aprons (J) to length so they were flush with the ends of the top, like you see in Figure 5. Then I cut a single end apron (K) for the left side of the bench. It's the same width as ^^he other aprons, but it's cut to ^P±ngth so ifs flush with the outside faces of the front/back aprons. For now I left the right end of the bench open. Later youH make a wider apron (and drill a few holes) to accommodate the twin-screw end vise (refer to page 26). But if you don't plan on installing the twin-screw vise, simply make a second end apron as shown in the No End Vise box below. Groove - After cutting the aprons to size, you can turn your attention to the grooves that run around the top of the bench and along the inside face of each apron, as you can see in Figure 5. These grooves accept hardboard splines that help align the No End Vise OptionIf you'd rather not add the twin-screw vise, the addition of the aprons is much simpler, as you can see in the photo above. All you'll need to do is make and install a second apron just like the one at the left end. Even without the twin-screw vise, you can still make use of all the dog holes using the bench dogs and accessories shown above. (Refer to Sources on page 35.) END APRONS SCRAP BOARDS HELP SUPPORT APRONS WHILE ROUTING APRON L.J._i— ROUT POCKET IN FRONT APRON FOR REAR JAW OF VISE (DETAIL 'a') FRONT 3 ■ APRON FRONT . APRON \ END VIEW REAR JAW OF VISE J aprons with the top of the bench while they're glued in place. A router and a slot cutter is all you need to make the grooves in both the top and aprons (Figures 6a and 8a). But you'll want to note that the grooves stop short of the exposed ends (Figure 8). Another thing to note is that the front apron has a small "pocket" routed in the back face to accommodate the rear jaw of the front vise (Figures 5,9, and 9a). The size of this pocket will depend upon the vise you use. I made mine deep enough for the thickness of the jaw and slightly oversized in width and length (Vie")- Splines - With the grooves and vise pocket complete, you can glue the aprons to the top using splines cut into strips from a sheet of V411 hardboard. Clamping the front and back aprons isn't a problem. But clamping across the length of the bench is a challenge. To see how I did this, take a look at the margin. After drilling some counterbored holes, I screwed the end apron in place and then plugged the holes with some dowel plugs (Figure 5). ▲ "Stretching" Your Clamps. A couple of cleats attached to the top of the bench allow you to clamp the end apron in place. No. 65 ShopNotes 23 |


