65 - Our Best Bench Yet, страница 26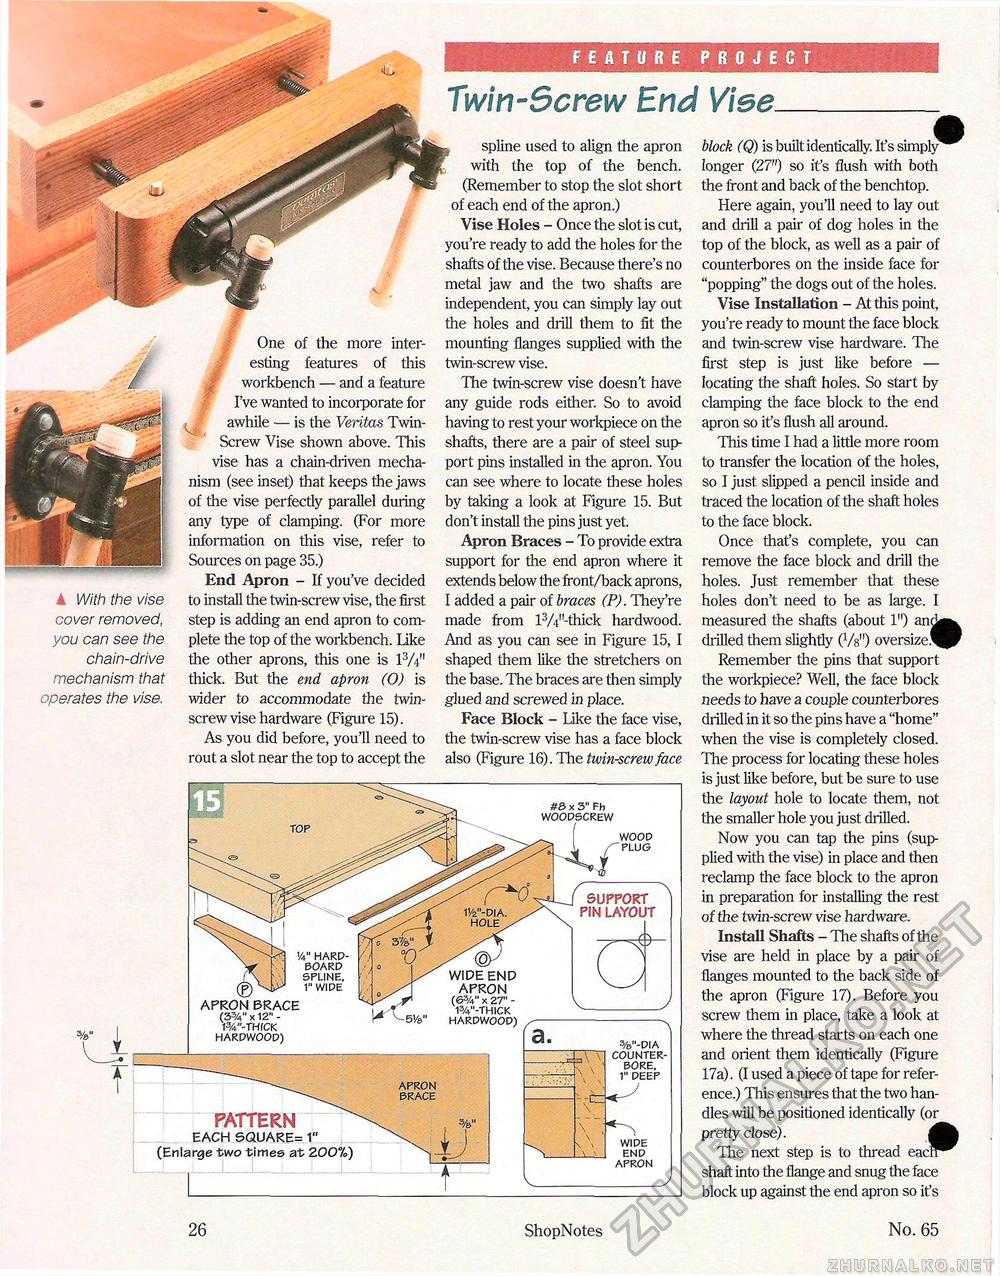
FEATURE PROJECT Twin-Screw End Vise. k With the vise cover removed, you can see the chain-drive mechanism that operates the vise. w Ml One of the more interesting features of this workbench — and a feature I've wanted to incorporate for awhile — is the Veritas Twin-Screw Vise shown above. This vise has a chain-driven mechanism (see inset) that keeps the jaws of the vise perfectly parallel during any type of clamping. (For more information on this vise, refer to Sources on page 35.) End Apron - If you've decided to install the twin-screw vise, the first step is adding an end apron to complete the top of the workbench. Like the other aprons, this one is 13A" thick. But the end apron (O) is wider to accommodate the twin-screw vise hardware (Figure 15). As you did before, you'll need to rout a slot near the top to accept the spline used to align the apron with the top of the bench. (Remember to stop the slot short of each end of the apron.) Vise Holes - Once the slot is cut, you're ready to add the holes for the shafts of the vise. Because there's no metal jaw and the two shafts are independent, you can simply lay out the holes and drill them to fit the mounting flanges supplied with the twin-screw vise. The twin-screw vise doesn't have any guide rods either. So to avoid having to rest your workpiece on the shafts, there are a pair of steel support pins installed in the apron. You can see where to locate these holes by taking a look at Figure 15. But don't install the pins just yet. Apron Braces - To provide extra support for the end apron where it extends below the front/back aprons, I added a pair of braces (P). They're made from l3/V'-thick hardwood. And as you can see in Figure 15, I shaped them like the stretchers on the base. The braces are then simply glued and screwed in place. Face Block - Like the face vise, the twin-screw vise has a face block also (Figure 16). The twin-screw face SUPPORT PIN LAYOUT APRON BRACE (3%" x 12" -W-XHICK HARDWOOD) PATTERN EACH SQUARE= 1" (Enlarge two times at 200%) - 5Ve>" (§>- WIDEEND APRON (6%" x 27" -W-THICK HARDWOOD)
WIDE END APRON %"-DIA COUNTERBORE. 1" DEEP WIDE END APRON block (Q) is built identically. If s simply longer (27") so it's flush with both the front and back of the benchtop. Here again, you'll need to lay out and drill a pair of dog holes in the top of the block, as well as a pair of counterbores on the inside face for "popping" the dogs out of the holes. Vise Installation - At this point, you're ready to mount the face block and twin-screw vise hardware. The first step is just like before — locating the shaft holes. So start by clamping the face block to the end apron so it's flush all around. This time I had a little more room to transfer the location of the holes, so I just slipped a pencil inside and traced the location of the shaft holes to the face block. Once that's complete, you can remove the face block and drill the holes. Just remember that these holes don't need to be as large. I measured the shafts (about 1") anck^ drilled them slightly (Vs") oversize Remember the pins that support the workpiece? Well, the face block needs to have a couple counterbores drilled in it so the pins have a "home" when the vise is completely closed. The process for locating these holes is just like before, but be sure to use the layout hole to locate them, not the smaller hole you just drilled. Now you can tap the pins (supplied with the vise) in place and then reclamp the face block to the apron in preparation for installing the rest of the twin-screw vise hardware. Install Shafts - The shafts of the vise are held in place by a pair of flanges mounted to the back side of the apron (Figure 17). Before you screw them in place, take a look at where the thread starts on each one and orient them identically (Figure 17a). (I used a piece of tape for reference.) This ensures that the two handles will be positioned identically (or pretty close). ^fe Hie next step is to thread eacl^ shaft into the flange and snug the face block up against the end apron so it's 26 ShopNotes No. 65 |
||||||||||||


