65 - Our Best Bench Yet, страница 25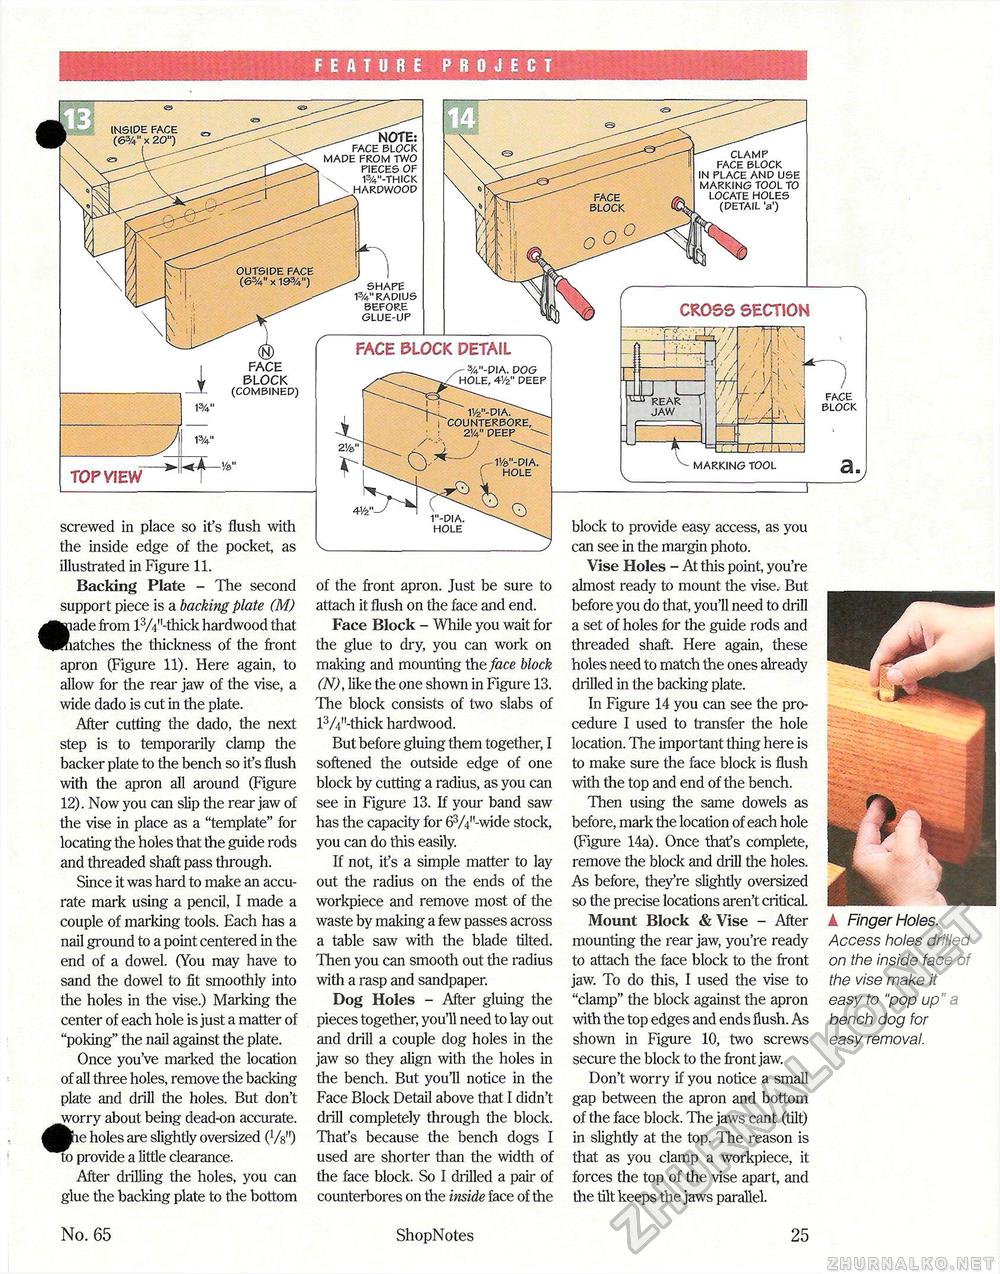
FEATURE PROJECT INSIDE FACE (&3A" x 20") ^-"NOTE: FACE BLOCK MADE FROM TWO PIECES OF \ W-THICK HARDWOOD CLAMP FACE BLOCK IN PLACE AND USE MARKING TOOL TO LOCATE HOLES (DETAIL 'a') FACE BLOCK OUTSIDE FACE (63/4" X 193/4") SHAPE 13/V' RADIUS BEFORE GLUE-UP CROSS SECTION FACE BLOCK DETAIL FACE BLOCK (COMBINED) - 3/4"-DIA. DOG HOLE, 41/2" DEEP FACE BLOCK 1'/2"-DIA. COUNTERBORE, 2V4" PEEP 11/&"-DIA. HOLE MARKING TOOL TOP VIEW im-dia. HOLE screwed in place so it's flush with the inside edge of the pocket, as block to provide easy access, as you can see in the margin photo. illustrated in Figure 11. Backing Plate - The second support piece is a backing plate (M) lade from l3/4"-thick hardwood that Kiatches the thickness of the front apron (Figure 11). Here again, to allow for the rear jaw of the vise, a wide dado is cut in the plate. After cutting the dado, the next step is to temporarily clamp the backer plate to the bench so it's flush with the apron all around (Figure 12). Now you can slip the rear jaw of the vise in place as a "template" for locating the holes that the guide rods and threaded shaft pass through. Since it was hard to make an accurate mark using a pencil, I made a couple of marking tools. Each has a nail ground to a point centered in the end of a dowel. (You may have to sand the dowel to fit smoothly into the holes in the vise.) Marking the center of each hole is just a matter of "poking" the nail against the plate. Once you've marked the location of all three holes, remove the backing plate and drill the holes. But don't _worry about being dead-on accurate. le holes are slightly oversized (Vs11) To provide a little clearance. After drilling the holes, you can glue the backing plate to the bottom of the front apron. Just be sure to attach it flush on the face and end. Face Block - While you wait for the glue to dry, you can work on making and mounting the face block (N), like the one shown in Figure 13. The block consists of two slabs of l3/4M-thick hardwood. But before gluing them together, I softened the outside edge of one block by cutting a radius, as you can see in Figure 13. If your band saw has the capacity for 63/4M-wide stock, you can do this easily. If not, it's a simple matter to lay out the radius on the ends of the workpiece and remove most of the waste by making a few passes across a table saw with the blade tilted. Then you can smooth out the radius with a rasp and sandpaper. Dog Holes - After gluing the pieces together, you'll need to lay out and drill a couple dog holes in the jaw so they align with the holes in the bench. But you'll notice in the Face Block Detail above that I didn't drill completely through the block. That's because the bench dogs I used are shorter than the width of the face block. So I drilled a pair of counterbores on the inside face of the Vise Holes - At this point, you're almost ready to mount the vise. But before you do that, you'll need to drill a set of holes for the guide rods and threaded shaft. Here again, these holes need to match the ones already drilled in the backing plate. In Figure 14 you can see the procedure I used to transfer the hole location. The important tiling here is to make sure the face block is flush with the top and end of the bench. Then using the same dowels as before, mark the location of each hole (Figure 14a). Once thafs complete, remove the block and drill the holes. As before, they're slightly oversized so the precise locations aren't critical. Mount Block & Vise - After mounting the rear jaw, you're ready to attach the face block to the front jaw. To do this, I used the vise to "clamp" the block against the apron with the top edges and ends flush. As shown in Figure 10, two screws secure the block to the front jaw. Don't worry if you notice a small gap between the apron and bottom of the face block. The jaws cant (tilt) in slightly at the top. The reason is that as you clamp a workpiece, it forces the top of the vise apart, and the tilt keeps the jaws parallel. A Finger Holes. Access holes drilled on the inside face of the vise make it easy to "pop up" a bench dog for easy removal. No. 65 ShopNotes 25 |


