Woodworker's Journal 1994-18-2, страница 27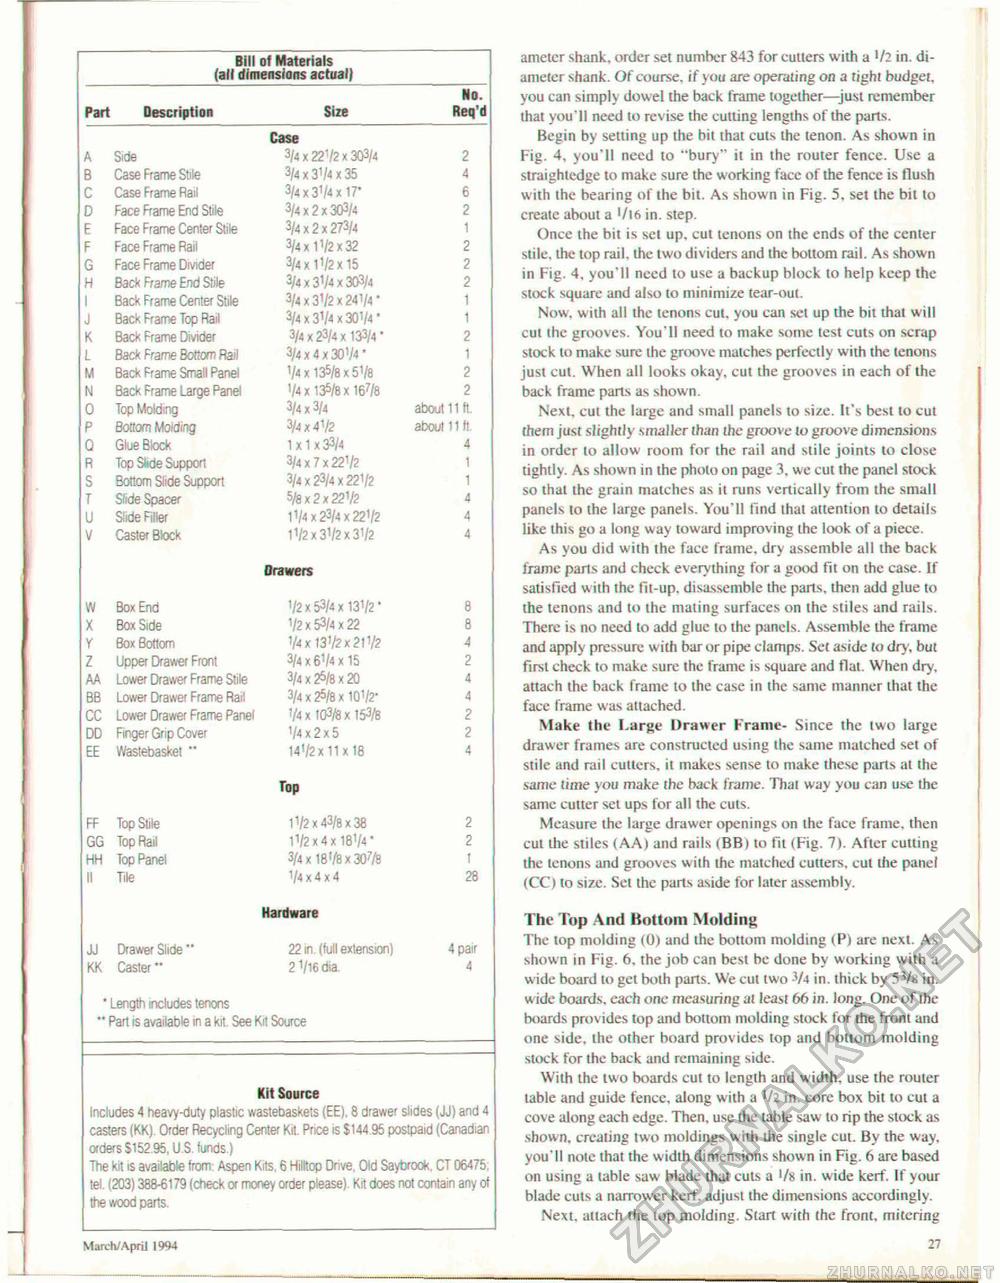
March/ April 1994 ametcr shank, order set number 843 for cullers with a l/2 in. diameter shank. Of course, if you are operating on a right budget, you can simply dowel the back frame together—Just remember that you'll need to revise the cutting lengths of the parts. Begin by setting up the bit that cuts the tenon. As shown in Fig. 4, you'll need to "bury" it in the router fence. Use a straightedge to make sure the working face of the fence is flush with the bearing of the bit. As shown in Fig. 5, set ihe bit to create about a '/lfi in. step. Once the bit is set up. cut tenons on the ends of the center stile, the top rail, the two dividers and the bottom rail. As shown in Fig. 4, you'll need to use a backup block to help keep the stock square and also to minimize tear-out. Now. with all the tenons cut. you can set up the bit that will cut the grooves. You'll need to make some test cuts on scrap stock to make sure the groove matches perfectly with the tenons just cut. When all looks okay, cut the grooves in each of the back frame parts as shown. Next, cut the large and small panels to size. It's best to cut them just slightly smaller than the groove lo groove dimensions in order lo allow room for the rail and stile joints to close tightly. As shown in ihe photo on page 3, we cut the panel stock so that the grain matches as it runs vertically from the small panels lo the large panels. You'll find that attention to details like this go a long way toward improving the look of a piece. As you did with the face frame, dry assemble all the back frame parts and check everything for a good fit on the case. If satisfied with the fit-up. disassemble the parts, then add glue to the tenons and to the mating surfaces on the stiles and rails. There is no need lo add glue to the panels. Assemble the frame and apply pressure with bar or pipe clamps. Set aside to dry. but first check to make sure the frame is square and flat. When dry, attach the back frame to the case in the same manner that the face frame was attached. Make the I.urge Drawer Frame- Since the two large drawer frames are constructed using the same matched set of stile and rail cutters, it makes sense to make these parts at the same time you make the back frame. That way you can use the same cutter set ups for all the cuts. Measure the large drawer openings on the face frame, then cut die stiles (AA) and rails (BB) lo fit (Fig. 7). Alter cutting the tenons and grooves with the matched cutters, cut the panel (CC) to size. Set the parts aside for later assembly. The Top And Bottom Molding The top molding (0) and the bottom molding (.Pi are next. As shown in Fig. 6. the job can best be done by working with a wide board lo get both parts. We cut two % in. thick by 53/« in. wide boards, each one measuring at least 66 in. long. One of the boards provides top and bottom molding stock for the front and one side, the other board prov ides lop and bottom molding stock for the back and remaining side. With the two boards cut to length and width, use the router table and guide fence, along with a >/2 in. core box bit to cut a cove along each edge. Then, use the table saw to rip the slock as shown, creating two moldings with the single cut. By the way, you'll mite that the width dimensions shown in Fig. 6 are based on using a table saw blade that cuts a '/8 in. wide kerf. If your blade cuts a narrower kerf, adjust the dimensions accordingly. Next, attach the top molding. Start with (he front, mitering 27 |
|||||||||||||||||||||||||||||||||||||||||||||||||||||||||||||||||||||||||||||||||||||||||||||||||||||||||||||||||||||||||||||||||||||||||||||||||||||||||||||||||||||


